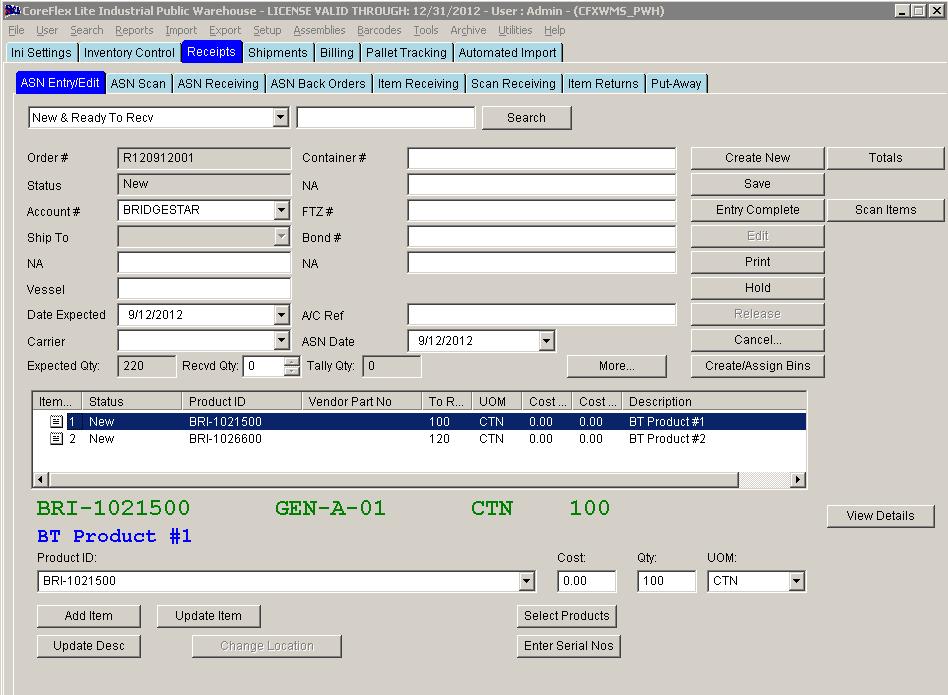
RECEIPTS ASN ENTRY / EDIT SCREEN

Update 22 Init 13
Overview:
- This screen is used to enter advanced shipping notices (ASN); this screen can be accessed from the receipts - ASN Entry Edit tab.
Query Section
-
Query Drop
Down and Query Field.
- The drop down at the top of the screen allows you to search for ASNs in various statuses. For some of the queries, a value in the Query Field (the field to the right of the drop down) will be required. After making a selection from the drop-down and entering a value in the field (if necessary), click the Search button and a list of ASNs meeting the criteria will be displayed. Double click on the one of the ASNs and will be brought up on the screen for editing or review.
- The Query List will be sorted based on the System Setting ASNs: Query Search Results Sorting.
Fields
- Expected Qty
- This is the total quantity entered on the ASN. It is not affected by the tally or receipt quantity. This value is also displayed on the Select Product Screen.
- Received Qty
- The quantity received so far for the ASN. This is the Quantity that will be used when Applying Account Charges with a Charge Source of ASN Cartons.
- Tally Qty
- The total quantity entered on the Receiving Tally Screen.
Buttons:
- Add Item
- This button will Add the item or product that you have chosen in the dropdown option.
- Cancel
- This will bring you up the Cancel ASN window where you Cancel the order and input the Reason(s) for cancelling it.
- Change Location
- This brings up the Change Receiving Location where you can Change the location of the product that you ordered. This button would only come up after you click Entry Complete.
- Create/Assigns Bin
- This brings you the Create Bins Options screen where you can Create Bins.
- Create New
- Clicking this button will Create a New Order #, and it will change the Status of the Order to New.
- Edit
- This will change the status of the order from Awaiting Receipt to New where you can Edit shipping information again.
- Entry Complete
- This will change the status of your order from New to Awaiting Receipt.
- Hold
- This brings up a window asking for comments with regard to the Hold on the order.
- More
- Clicking this button would bring you the PO Data screen where you input additional shipping information about the order.
- Print
- This brings up the Print window where you would choose your printer Name, it is also where you set the Print Range and input how many Copies you would be printing.
- Save
- This will Save the information that you input on the ASN Entry/Edit Screen. The saved information can be used for future reference.
- Search
- This will bring up the Search Results window with a table showing different information about the products you are searching for.
- Select Products
- This will bring you up the Select Products window where you could Search and Select Products that you are going to order.
- Totals
- This will bring you up the Item Totals window; showing the Total Price, Total Cube and the Total Weight.
- Update Item
- This will update the item you have Added to the system
- Update Desc
- This button will open up the Update Description page where you can change the Description of the products.
- View Details
- This will show you the View Order window where you can see the products that you Ordered.