RECEIVE PO
This function allows you to receive POs entered or imported
into Coreflex using the desktop application.
POs must in a status of Awaiting Receipt.
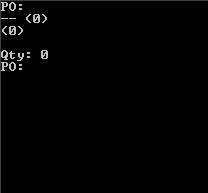
- Below
is the first screen which is displayed after select Receive PO on the
Receiving Menu.
- Enter
a question mark (?) to search for a PO to
receive. If the PO
# is known, it may also be entered or scanned directly. After entering a Question Mark, the
following menu is displayed which prompting for how to lookup the PO.
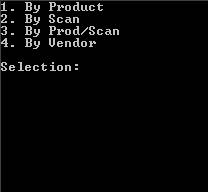
- Enter
number corresponding to how you would like to Query the PO. Our example will use the Product
selection.
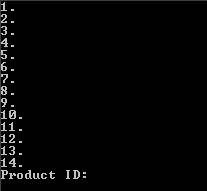
- Enter
or Scan a Product in the receipt.
All POs in a status of Awaiting Receipt that have the scanned
product on it will be displayed.
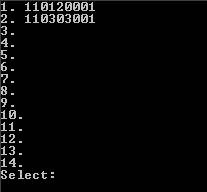
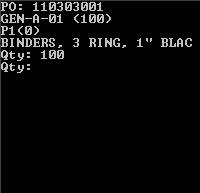
- Enter
the number that corresponds to the PO in
the List and PO Information will be displayed. The Screen prompts for Reference #. Note that the Reference # prompt must be
enabled using the Receive PO/ASN Reference Prompt to Enabled on the RF Prompt Configuration
screen.
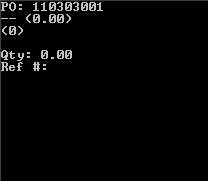
- Enter
the Reference #. Based on the
settings QuickBooks: PO Field to use
for Ref No and QuickBooks: PO
Item Field to use for Ref No when creating Split Item Receipts when
creating Item Receipts in the RF Prompt
Configuration screen, the reference field will update the PO Reference
# on the PO
Receiving and a PO Items Field. The Screen prompts for Location.
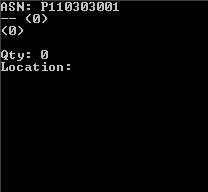
- Scan a
Location to receive the inventory into.
The screen will prompt for a ProductId.
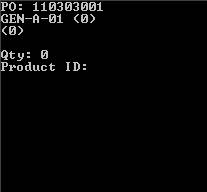
- Enter
or Scan the Productid being received.
The screen will display the Product information, the qty of the
product in the location, and the qty of the product on the PO. The
Screen will prompt for the Lot # being received. If Feature Lot Control is not on, it
will prompt for Qty next (Skip to 10).
Also, this prompt can be disabled by setting the Receive PO/ASN Lot
Prompt Default to Disabled on the RF Prompt Configuration
screen.

- Enter
the Lot # or enter a space for no
lot. The Screen will prompt for an
Expiration Date. This prompt can be
disabled by setting the Receive PO/ASN Exp Date Prompt Default to Disabled
on the RF
Prompt Configuration screen.
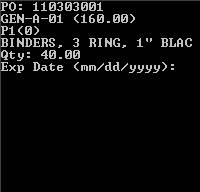
- Enter
the expiration date in the format shown on the screen or enter a space for
no Expiration Date. The Screen will
prompt for Qty.
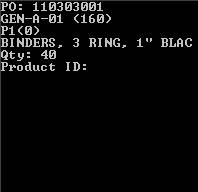
- Enter
the Qty to receive of the product shown into the location shown. This does not have to be the full amount
of the PO. In this example, we receive 40 out of
the 100 on the PO. The System will now prompt for another
Product to receive.
- Either
Scan the next product on the PO or press
Enter to scan a different Location.
Repeat the process until all items are received. After all items are received, press
enter until the following screen is displayed:
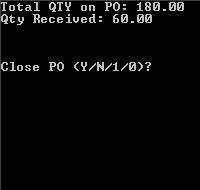
- This
screen confirms that you want to exit the PO and allows you to either
Close the PO or not.
- Close
PO (Enter Y or 1). The PO
will go to a status of receiving complete. Based on the Prompt
Configuration Quick Books: Create Bill it will either go to a status
of Receiving Complete (Yes) or Awaiting Backorder Generation (No). All POs with a status of Receiving Complete
will have Bills generated in Quick Books for them using the QuickBooks Export
Screen before going to a status of Awaiting Backorder generation
themselves.
- Do
Not Close PO (Enter N or 0). The PO
will remain in a status of Awaiting Receipt. Any individual items received will have
Sub Items with a status of Receiving Complete for each location the
product was received into. This can
be displayed on the PO
Receiving screen in the desktop application. The
PO
can continue to be received against using the RF at a later time.
- After
making an entry, the screen will go back to prompting for a PO.