1.0 Export Current Inventory
1.1 This step may be skipped if you do not wish to start with the existing inventory in spreadsheet. Instead, use the WMS Inventory Import file example to start with and go to step 2.
1.2 Go to the Export Menu and select Inventory. The Export Inventory Dialog will open.
1.3 Set the Start Area and Stop Area as desired. Only the Inventory with area equal to or in between the Start and Stop Areas will be exported.
1.4 Click the Export Inventory button.
1.5 The Export file will go into the C:\Program Files\Coreflex\Rel_2.4.6a\CFXWMS\Exports folder.
2.0 Update Spreadsheet
2.1 Update the Quantity column with the actual counts.
2.2 If necessary, add new lines for the spreadsheet for location found containing inventory not in the system.
3.0 Import Updated Spreadsheet
3.1 Go to the Import Menu and select Inventory (Counts Only).
3.2 The Import Inventory Counts dialog opens.
3.3 Click the Import Inventory button.
3.4 A dialog will let you find the file to open.
4.0 Apply the Inventory Counts
4.1 Go the Inventory Control | Physical Inventory | Apply Counts tab.
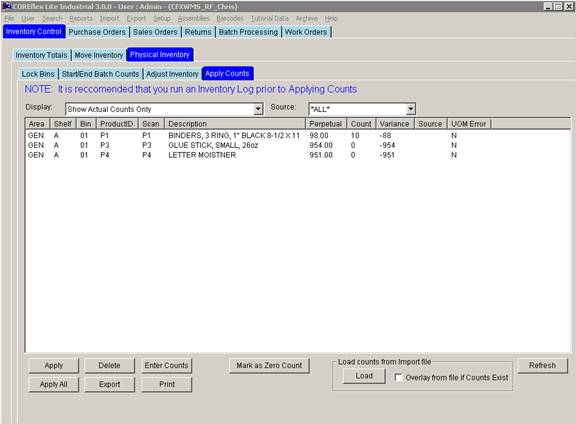
4.2 Set the Display drop-down to “Show Actual Counts Only”.
4.3 Set the Source to ALL.
4.4 Click the refresh button. This will show any counts previously in the system. These counts may be deleted, if you wish, by highlighting them all and clicking the Delete button.
4.5 Click the Load Button. This will load in the counts from the file you just imported on the Import Inventory Counts screen. If any previous counts existed for that product in that location, they can be overlaid by checking Overlay from file if Count Exists.
4.6 The counts from the file should appear on the screen.
4.7 The counts can be viewed in different ways using the Display drop down:
4.7.1 Show Actual Counts Only
4.7.1.1 Only displays the perpetual inventory for the product and location actually counted.
4.7.2 Show Uncounted Locations for counted products
4.7.2.1 Displays all perpetual locations for any products counted.
4.7.2.2 Inventory not included in the count will be marked as NOT COUNTED in the Count Field.
4.7.3 Show Uncounted Products for counted locations
4.7.3.1 Displays the entire contents for any location counted.
4.7.3.2 Inventory not included in the count will be marked as NOT COUNTED in the Count Field.
4.7.4 Show All
4.7.4.1 Displays All Perpetual Inventory levels.
4.7.4.2 Inventory not included in the count will be marked as NOT COUNTED in the Count Field.
4.8 Count may be entered manually by clicking the Enter Counts Button. See the Enter Counts Manually screen documentation.
4.9 To apply the count, highlight the line and click Apply.
4.9.1 Perpetual Inventory for an item in the list that has a count of NOT COUNTED will not be updated. To remove inventory from a location that has not been counted you must first highlight the line and click Mark as Zero. This will set the count to 0 for that product and location and confirms that you have counted the location and know that none of that product exists in it.
4.9.2 After you successfully apply a line, it will be removed from the screen, the inventory is adjusted, and there will be an entry placed in Product History indicating the adjustment.