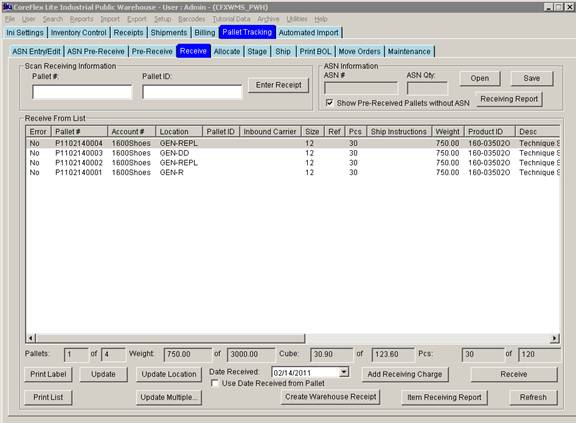
PALLET TRACKING – RECEIVE SCREEN
PWH – Update 22 Init 12
- Receiving Pre-Received (No ASN) Pallets
- If enabled, check the Show Pre-Received Pallets without ASN checkbox.
- Click the Refresh button to view Pallets which have been pre-received in the system.
- Set the Date Received as desired (see the section below on setting the Receive Date).
- Click the Receive Button.
- Received Pallets will get a status of 3100 – Received and will be removed from the screen.
- Update Multiple Button
- To update the information on multiple pallets, highlight the pallets to be updated and click the Update Multiple… Button. The Update Multiple Dialog box opens (shown below).
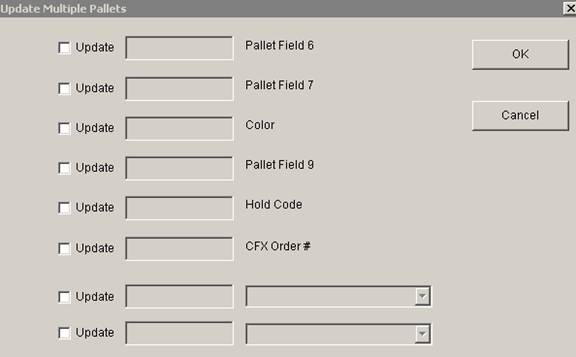
- To update any of the first six fields listed, check Update next to that field and enter the new value. Any or all of the fields may be updated.
- If the field to be updated is not displayed in the first six, check Update on either of the last 2 fields and use the drop down box to find the field to be updated. Enter the new value in the center box. Neither, One or both of these fields may be used to update Pallet Fields in additional to any fields checked above.
- Click OK and then Yes when prompted and the pallets highlighted in the first step will be updated.
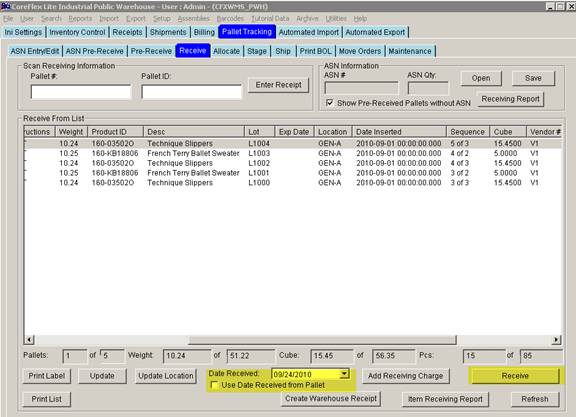
- Setting the Receive Date
- To set the receive date of the pallet directly, uncheck the Use Date Received from Pallet checkbox and enter a date in the Date Received entry field. All pallets received will use this date.
- If the pallets are imported into the system, you can set the receive date on the import by including a Date_Created field in the import file. To set the receive date equal to the Date_Created in the file, check the User Date Received from Pallet checkbox and receive the pallets. The Date_created field shows up in the list in this screen as Date Inserted.
- Updating Pallet Locations
- To update the Location of one or more Pallets, highlight the desired pallets and click the Update Location Button. The Update Location Dialog appears.
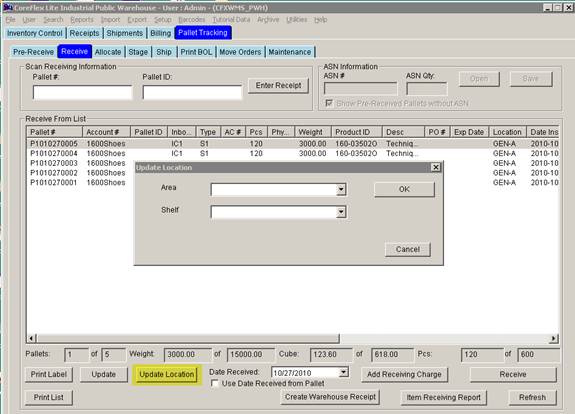
- Enter or select an Area
- Enter or select a Shelf
- Click the OK Button or hit the enter key while still on the shelf drop down.
- Click Yes when asked if you are sure.
- All of the Pallets highlighted will have their locations updated.
- Buttons
- Receive
i. Receives the Highlighted Pallets into Inventory.
ii. Pallets will be set to a status of 3100 unless they have a hold code set. If a hold code is set and the System Setting is set for putting pallets on hold on receipt the pallet will be set to a status of 3900.
iii. The contents of the Physical Pallet ID Field (field is specified by the System Setting: Pallet Tracking – Physical Pallet ID Field) is copied to the Original Physical Pallet ID field which is used for Billing Purposes and can be updated on the Pallet Tracking – Maintenance – Update Multiple screen.
- Create Warehouse Receipt
i. Pops up the Create Warehouse Receipt screen which allows you to generate, review, and print Warehouse Receipts. When this button is clicked, a pop-up message will appear if any Pending Charges are due to be billed. The message includes instructions for viewing the pending charges. For this message to pop-up, the Account Preference Display Notice on WH Receipt Screen for pending Charges Past Due must be set to yes.