PALLET TRACKING – MOVE ORDERS SCREEN
PWH – Update 22 Init 12
1.0 Use this screen to Create, Print, and confirm Work Orders for moving and combining Pallet Inventory. Work orders may be for internal moves within a Warehouse or moves from one warehouse to another.
2.0 Steps for Processing a Work-Order
2.1 Click NEW to open a new work order. If a work order is already on the screen, click Save to clear it and then click NEW.
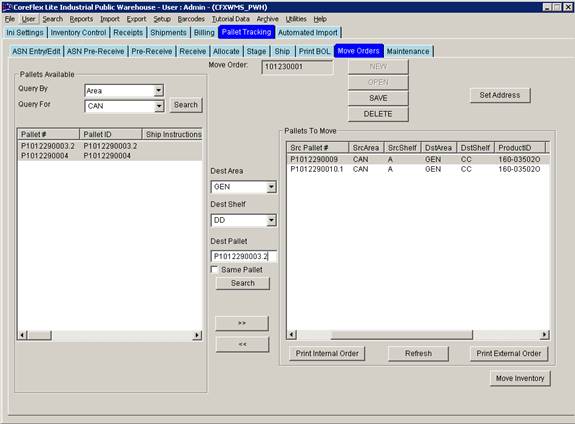
2.2 If the Work Order is for shipping pallets to another Warehouse, click the Set Address button to enter the shipping address of the destination Warehouse.
2.3 Pallets to move are queried on the left side of the screen in the Pallets Available Section. Use the Query By Combo, Query For Combo, and Search Button to find the Pallets to be moved.
2.3.1 The example above will list all the Pallets in the Can Area that are not on a Move Order.
2.4 If the Pallet is to be moved and not combined on another pallet, check Same Pallet. If you would like to combine the inventory on another pallet with the same productid, uncheck Same Pallet and enter a Pallet # to put the inventory on or use the Select Button (see 2.5 below).
2.4.1 In the example above, the two pallets in the right list were added with Same Pallet checked and a Dest Area of GEN and Dest Shelf of CC.
2.4.2 Also in the example above, the two pallets on the left will have their inventory combined and placed on the first Pallet (P1012290003.2) and the new pallet will be moved to location GEN-DD.
2.5 Use the Search Button in the center of the screen to find a destination Area and Shelf (and Pallet if Same Pallet is unchecked). A screen will appear listing all the locations for the product highlighted in the left list. Double click on a location and the Dest Area and Dest Shelf will be populated on this screen. The Pallet will also be populated if Same Pallet is unchecked.
2.6 Once the Pallet(s) to move are highlighted (left list) and a destination location is selected (center), click the >> Button and the Move will be added to the Move Work Order. Pallets can be removed using the << Button.
2.6.1 When a Pallet is added to a Move Order, its inventory is frozen and its Pallet Status is changed to 8100 – In Transit until it is either removed from the work order or the Move Inventory button is clicked.
2.7 When all the desired pallet have been added to the Move Work order, print the work order using either:
2.7.1 Print Internal Order – Prints as a simple Move Work Order within the Warehouse
2.7.2 Print External Order – Prints as a pick sheet with a destination address for sending to external warehouses.
2.8 Click Save to close the work order until the move has been physically made.
2.9 Click Open to open the work order after the moves have been made by the operators. Adjust the work order based on what was Physically performed.
2.10 Highlight all the pallets on the Work Order (right list) and click the Move Inventory button. All the moves and combinations will be made and the highlighted moves will be cleared from the screen.
2.11Click Save to close the Work Order.
3.0 Other Buttons:
3.1 Refresh – Refreshes the Lists on the screen.
3.2 Delete – Deletes the Work Order. The work order can only be deleted if there are no Outstanding Moves on the order and no Moves have ever been confirmed against the order.